Linux 下的动态共享库
文章目录

0. 前言
通过上次那个 Rtudio 输入法的事情 (解决 Debian 中 Mendeley Desktop 和 RStudio 无法使用 fcitx 输入中文的问题) ,我又觉得编译啊共享库啊什么的很有趣,然后我懂的太少。所以补课看了一些东西,这一篇我觉得很基础,也很有启发性。把这篇和之前的 关于源码编译的基础知识:出错原因解析和解决 via LinuxSir 可以一起看(其实主要是我整理的时候发现那一篇因为没有上下文确实有点乱,然后现在我也没法补充)。
参考:
- 在 Linux 使用 GCC 编译 C 语言共享库:我这篇博文很多东西参考的博客园上的这篇博文写成,举例也是用的这个。但我自己参照其他做了很多改动。
- Shared libraries with GCC on Linux:这似乎是上面这篇博文的英语原文。
- C 语言的编译过程: 这篇 ChinaUnix 上看到的博文对具体每个步骤发生了什么,涉及到哪些东西列举了很多。
- C 语言编译过程详解 : 这篇博客园的博文对编译整个过程里解释和举例都讲解得很清楚。
- Linux Tutorial - Static, Shared Dynamic and Loadable Linux Libraries:这篇文档详细解释了动态库和静态库,配合举例分别使用了动态库和静态库,过程也写得很详细。
- linux 静态库、共享库:这篇 ChinaUnix 上的博文通过例子讲解动态库和静态库的生成和使用,例子很好。
- GCC online documentation:gcc 的官方文档,没什么好说的,RTFM~
- Program Library HOWTO: 3. Shared Libraries:讲动态库、soname 及其使用的文档。
- Can someone explain about Linux library naming? :StackOverflow 上关于 Linux 下库命名的问题。
- linux dll hell–链接库real name, soname, link name:博客园上一篇讲动态库的命名的博文。
- How to print the ld(linker) search path:StackOverflow 上关于 Linux 下 linker 搜索路径的问题,大家看法似乎不大一致,但总的来说得到的系统路径相差不大。
(中文参考博客我已经尽力找到原文,但仍然不排除其中一些是未注明出处的转载)
这是一篇很基础的博文,通过一个小例子说明 Linux 下共享库的创建和使用。很多文字我都比较随意,所以显得口语化和不严谨,想要严谨的话请阅读相关文档。
首先说说库文件是什么。库本质上就是写好的、并且预编译好的,可以直接调用的二进制代码。为什么会有这种东西呢?简单的例子,像打印字符、求和求差求乘积求余数这种很常见的函数,不可能每一次程序员写代码要用的时候都自己把求和求差的原始代码再写一次。我们想只写一次,以后直接调用就完了。但是在一个文件里还行,调用什么的很方便,如果我换了一个文件呢?甚至是,我写一个工程的时候要调用另一个工程里已经写过的一个函数怎么办呢?这时候的解决办法就是把很常用的,或者说可能其他地方还会用的函数代码编译成库,这样以后都直接调用这个库就行了。还有其他的例子是,你想把你写的东西共享出去但是又不想贡献源码,也可以编译成库让人家直接调用。因为库文件已经是编译好了的二进制文件,所以别人能用,但是不知道我的源码。
Linux 下呢,我们预先规定好一些特定的路径默认用来存放库文件,这样以后大家用到那种很常用的、别人提供但是你要调用的东西你们都到这些标准路径来找,没有了就报错 “libxxx.so: No such file or directory”。这个后面再详细说。
Linux 下 C 语言库分静态库和动态库:
- 静态库(Static libraries, e.g. /usr/lib/x86_64-linux-gnu/libreadline.a):拓展名来自 archive。静态库在编译时链接到目标,并且最终直接编译进入可执行文件成为其的一部分。好处是程序能拿到哪儿在哪儿跑起来,因为需要的库都包含进去了。坏处就是文件大,而且当其中某个库升级的时候必须整体重新编译一次来包含最新的库。
- 动态库(Dynamically linked shared object libraries, e.g. /lib/x86_64-linux-gnu/libm-2.28.so): 全名就是动态共享库,或者叫 Shared Objects,这也是文件拓展名 so 的来源。动态库在编译的时候并没有被编译进最终的可执行文件中,程序执行到库的函数时才调用,所以动态库所产生的可执行文件比较小。由于库文件没有被整合而是在程序运行时动态调用,所以在程序的运行环境中必须提供相应的库。动态库只要调用接口不变,可以单独升级库文件而保证可执行文件还能正常调用不出错。如果多个应用程序都要使用同一函数库,动态库就非常适合,可以减少程序的体积。
在具体举例使用动态库之前,我们首先看看从源代码到编译成可运行程序并运行,这整个过程发生的各个步骤:
预处理(Preprocessing):这个阶段处理所有预处理指令。基本上处理就是源代码中所有以 “#” 开始的行,例如 #define 和 #include 等,将 include 的头文件插入原文件中、将宏定义展开、根据条件编译命令选择要使用的代码,删除代码里的注释等等。
如果我们引用自定义的头文件,此时在 #include 中要用双引号 “” 而不是尖括号 <>。
预处理的结果会输出到一个 xxx.i 文件中,这个文件本身仍然是文本文件,但体积会大很多。使用
gcc -E hello.c -o hello.i可以得到此文件。-E 选项就是告诉编译器在预处理之后就退出,不进行后续编译过程编译(Compilation):一旦源文件预处理完毕,接下来就是编译。很多时候我们提到编译时都是指整个程序构建过程,所以本步骤也称作 “compilation proper”,仅指代将经过预处理之后的代码转换成汇编代码(assembly code)的过程。
这个步骤将产生中间文件 xxx.s,文件由汇编代码写成。
gcc -S hello.c -o hello.s即可得到这个文件,-S 选项告诉编译器只做编译,不要汇编或者链接。这个文件也是文本文件,只是它是由汇编语言写的,大多数人可能都看不懂。汇编(Assemble):汇编就很好懂了,把汇编代码写的文件转成机器能懂的机器码。由于机器只能懂二进制语言,所以到这里文件就成了二进制文件了,人类肯定已经不可读了。
这一步产生的文件叫目标文件 xxx.o。
gcc -c hello.s -o hello.o即可得到。gcc 实际使用的汇编器是 as (as 就是 Assembler 的首字母啦),所以这一步也能as hello.s -o hello.o这样写。每个源码文件都会生成一个单独的目标文件。链接(Linking):这一步将所有的目标文件 xxx.o 和所需要的库文件链接起来使之成为最后的可执行文件。这一步不仅会链接我们自己编写的代码产生的库文件,同时也会链接系统的库文件,常见的的例子就是
#include <stdio.h>这种引用标准 C 语言库的情况。gcc 默认链接器是 ld。加载:这个步骤发生在可执行文件启动时。首先加载器扫描出可执行文件引用的共享库,所有被发现的引用都立即生效,对应的库也被映射到程序。
从 4 和 5 可以看到,可运行程序如果包含了对动态共享库的引用,那么在生成可执行文件的链接阶段,以及可执行文件运行的时候,都需要这个库。如果其中某个步骤库不存在,或者找不到(其实这是一回事),命令就会报错。
1 - 4 步图示:
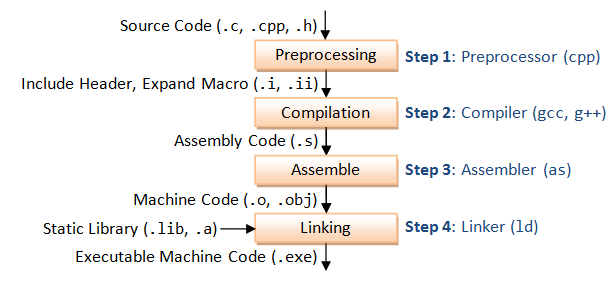
source: GCC and Make Compiling, Linking and Building C/C++ Applications
1. 一个动态共享库生成和使用实例
下面通过一个例子来说明这个过程。
首先我们有三个文件 foo.h,foo.c 和 main.c:
|
|
foo.h 定义了一个接口使用我们自己写的小函数 foo(),这也是我们想生成库的函数,最后得到的这个库里也将只有这一个简单的函数foo()。foo.c 则是这个函数的具体实现,main.c 是一个用到我们库的主程序。最终我们想要用 main.c 生成一个可执行文件,这个可执行文件将会引用我们从 foo.c 生成的动态共享库。
Step 1: 使用 -fpic 选项编译
我们需要把我们库的源文件编译成位置无关代码(Position Independent Code, PIC)。位置无关代码是存储在主内存中的机器码,执行的时候与绝对地址无关。有两个选项 -fpic 和 -fPIC。直接 RTFM 吧,虽然我也不大懂:
-fpic
Generate position-independent code (PIC) suitable for use in a shared library, if supported for the target machine. Such code accesses all constant addresses through a global offset table (GOT). The dynamic loader resolves the GOT entries when the program starts (the dynamic loader is not part of GCC; it is part of the operating system). If the GOT size for the linked executable exceeds a machine-specific maximum size, you get an error message from the linker indicating that -fpic does not work; in that case, recompile with -fPIC instead. (These maximums are 8k on the SPARC, 28k on AArch64 and 32k on the m68k and RS/6000. The x86 has no such limit.)
Position-independent code requires special support, and therefore works only on certain machines. For the x86, GCC supports PIC for System V but not for the Sun 386i. Code generated for the IBM RS/6000 is always position-independent.
When this flag is set, the macros __pic__ and __PIC__ are defined to 1.
-fPIC
If supported for the target machine, emit position-independent code, suitable for dynamic linking and avoiding any limit on the size of the global offset table. This option makes a difference on AArch64, m68k, PowerPC and SPARC.
Position-independent code requires special support, and therefore works only on certain machines.
When this flag is set, the macros __pic__ and __PIC__ are defined to 2.
直接来吧:
|
|
这一步直接得到目标文件 foo.o。选项 -Wall 和 -Werror:
-Wall
This enables all the warnings about constructions that some users consider questionable, and that are easy to avoid (or modify to prevent the warning), even in conjunction with macros.
-Werror
Make all warnings into errors.
Step 2: 创建共享库
现在让我们将目标文件编译成共享库。我们将其命名为 libfoo.so:
|
|
现在就得到了 libfoo.so 这个动态库文件了。
Step 3: 链接共享库
现在我们得到共享库了,下一步就是编译 main.c 并让它链接到我们创建的这个共享库上。我们将最终的运行程序命名为 test。
|
|
-lfoo 选项并不是搜寻 foo.o,而是 libfoo.so。gcc 编译器假定所有的库都是以“lib”开头,以“.so”或“.a”结尾。而 -lc 表示标准 C 语言库,因为我们的代码还引用了 stdio.h 这个头文件。
如无意外,我们直接用上面的命令编译会出现报错:
|
|
链接器 ld 没有找到我们的共享库 libfoo.so。
链接器并不知道该去哪里找 libfoo.so(事实上是不会去标准系统路径以外的地方去找共享库)。我们要指定 gcc 去哪找共享库。
gcc 有一个默认的搜索列表,但我们的工作目录并不在这个列表中,所以我们需要告诉 gcc 去哪里找 libfoo.so。这就要用到 -L 选项。这里我们直接使用当前目录 . 就行:
|
|
注意,这时候 -L 和 -l 两个选项一起用,一个指定搜索路径,另一个指定要搜索的库。
这样就能顺利编译出可执行文件 test。我们执行看看:
Step 4: 可执行文件
|
|
报错了,出错原因还是找不到 libfoo.so 文件。虽然链接的时候我们通过指定路径链接成功了,但是运行时 libfoo.so 一样找不到。
我们可以看看 test 的动态库依赖情况:
|
|
果然,libfoo.so 找不到。
那在运行时要怎么指定去哪儿找这个库文件呢?两个办法:
- 把需要的库文件(本例中的
libfoo.so)移动到系统标准路径去; - 通过
LD_LIBRARY_PATH环境变量或者rpath选项临时启用非标准路径中的库文件。
这里我们重点看看第二个方法。
LD_LIBRARY_PATH 环境变量
先看看目前的 LD_LIBRARY_PATH 是什么:
|
|
这个环境变量内容默认为空,即没有存储任何路径。现在把当前工作目录添加到 LD_LIBRARY_PATH 中:
|
|
为什么还报错呢?
虽然我们的当前路径在 LD_LIBRARY_PATH 中,但是我们还没有导出 (export) 它。在 Linux 中,如果你不将修改 export 的话这个环境变量对后面的命令是不起不作用的。所以我们 export 一下就行了:
|
|
整个过程很明显了。
LD_LIBRARY_PATH 很适合用来做快速测试,尤其在没有权限将需要的库放到系统标准路径或者只是想临时测试一下文件是否能用的情况下。但另一方面,导出 LD_LIBRARY_PATH 变量意味着可能会造成其他依赖 LD_LIBRARY_PATH 的程序出现问题(比如当前目录里有与系统库重名的库,但是这个库是测试用的而且可能本身就是坏的或者与其他程序需要的版本不同),因此在做完测试后最好 unset 将其恢复成之前的样子。
rpath 选项
再来看看 rpath 选项的用法:
|
|
也没问题。
注意这里的 -Wl,-rpath=. 这个选项的写法。-Wl 代表选项传给 linker,类似的:
| Options | Description |
|---|---|
| -Wa,<options> | Pass comma-separated options on to the assembler. |
| -Wp,<options> | Pass comma-separated options on to the preprocessor. |
| -Wl,<options> | Pass comma-separated options on to the linker. |
另外注意这里 -L. 选项也还在。
rpath 方法有一个优点,对于每个程序编译时我们都可以通过这个选项单独罗列它自己的共享库位置,因此不同的程序可以在指定到不同路径去加载需要的库文件,而不需要一次次的去指定 LD_LIBRARY_PATH 环境变量。
2. Linux 下库的命令和路径
动态库的 soname, real name 和 linker name
由于库文件是用来让不同的程序都可以引用的,那么就存在一个问题,如果我是一个库的维护者,现在我把我的库一升级,而且升级之后库的用法和之前不一样了,那岂不是依赖我的库的程序立马都玩完?推开了去,大家都这么搞,系统不分分钟用不下去了么?为了解决这个问题,Linux 下有一种约定俗成的库的命名方式。这就涉及到 soname、real name 和 linker name 了。
首先看我电脑上现在有的一个例子:
|
|
可以看到,就 libcurl.so 这个库一共存在 3 个文件,本体是 libcurl.so.4.5.0,其余的 libcurl.so.4 和 libcurl.so 都是指向本体的软链接。
首先,本体 libcurl.so.4.5.0 是实际上包含代码的文件,这个文件名就是库的 real name。一般命名规则是:
$$ libxxx.so.major.minor.patch $$
lib 是前缀,xxx 则是这个库的“名字”,so 表明这是个 shared object 即共享库,major、minor、patch 则分别指代库文件的主版本号、次版本号和 patch(或 build) 号。
一般的,如果库文件保持接口不变,那么 major 不变,如果更新不再兼容以前的接口 major 号就要增加。所以我们一般说一个库的版本就是指代 major 号,因为一个版本的库接口是不会变的。增加新的 feature 的升级可以改 minor 号,并且 minor 版本升级一般是保证与旧版兼容的。而如果有小升级、bug 修复等等就只改一下 patch 号就行。
搞清楚了这个就很好懂 soname 了,soname 一般就是 libxxx.so.major,soname 的存在保证只要程序找的时候 soname 不变(即接口不变)那么程序就能正常运行。比如库升级了 real name 必然是会变化的,但只要 major 不变,把 soname 文件重新指向更新的库文件即可。如果安装了一个 major 发生变化的新版本的库,那就新生成一个 soname 指向这个库,这样就实现了库文件的升级和多个版本库文件的共存。需要新版本库的程序去找那个新生成的 soname,原来的程序还是找原来的 soname,大家皆大欢喜,而库升级也完成了。
而 linker name,从名字就看出来它和链接器 linker 有关,linker name 不包含任何版本信息,用来方便链接器查找库文件。比如我们前面在 gcc 命令里每次指定 libfoo.so 都只写了 -lfoo,链接器会自己去找 libfoo.so,这时候它要找的其实就是 linker name 所代表的文件。
ldd 和 ldconfig
ldd 前面就用到了,我们看看 man ldd 对它的解释:
1 2 3 4 5 6 7 8 9 10 11 12 13 14 15 16 17 18 19 20 |
NAME
ldd - print shared object dependencies
SYNOPSIS
ldd [option]... file...
DESCRIPTION
ldd prints the shared objects (shared libraries) required by each program or shared object specified on the command line. An example of its use and
output is the following:
$ ldd /bin/ls
linux-vdso.so.1 (0x00007ffcc3563000)
libselinux.so.1 => /lib64/libselinux.so.1 (0x00007f87e5459000)
libcap.so.2 => /lib64/libcap.so.2 (0x00007f87e5254000)
libc.so.6 => /lib64/libc.so.6 (0x00007f87e4e92000)
libpcre.so.1 => /lib64/libpcre.so.1 (0x00007f87e4c22000)
libdl.so.2 => /lib64/libdl.so.2 (0x00007f87e4a1e000)
/lib64/ld-linux-x86-64.so.2 (0x00005574bf12e000)
libattr.so.1 => /lib64/libattr.so.1 (0x00007f87e4817000)
libpthread.so.0 => /lib64/libpthread.so.0 (0x00007f87e45fa000) |
ldd 就是用来查看动态库依赖的。另外,readelf 指定 -d 参数也可以实现这一功能:
|
|
可以看到我们前面编译出的 test 依赖 libc.so.6 和我们自己编译生成的 libfoo.so。
ldconfig 介绍:
1 2 3 4 5 6 7 8 9 10 11 12 13 14 15 16 17 18 |
NAME
       ldconfig - configure dynamic linker run-time bindings

SYNOPSIS
       /sbin/ldconfig [-nNvXV] [-f conf] [-C cache] [-r root] directory...
       /sbin/ldconfig -l [-v] library...
       /sbin/ldconfig -p

DESCRIPTION
       ldconfig creates the necessary links and cache to the most recent shared libraries found in the directories specified on the command line, in the file
       /etc/ld.so.conf, and in the trusted directories, /lib and /usr/lib (on some 64-bit architectures such as x86-64, /lib and /usr/lib are the trusted di‐
       rectories for 32-bit libraries, while /lib64 and /usr/lib64 are used for 64-bit libraries).

       The  cache  is used by the run-time linker, ld.so or ld-linux.so.  ldconfig checks the header and filenames of the libraries it encounters when deter‐
       mining which versions should have their links updated.

       ldconfig will attempt to deduce the type of ELF libraries (i.e., libc5 or libc6/glibc) based on what C libraries,  if  any,  the  library  was  linked
against. |
ldconfig 用来给系统指定目录的库文件生成必要的链接并缓存所有库文件。这里的生成必要的链接就指前面提到的 real name 的 soname 和 linker name 链接(实际中我看系统里好像大部分库都只有 soname,linker name 很多都没有)。因为一般我们自己编译出来的库文件都是包含二进制代码的本体文件,即有了 real name。只要我们把库文件放在系统标准路径,然后运行 ldconfig (需要 root 权限),它就会自动给我们生成 linker name 和 soname 链接文件。
仍然用前面的例子说明 ldconfig 自动生成 soname:
|
|
可以看到,如果我们在 gcc 编译的时候给 linker 传递一个 -soname 选项,在生成的动态库中 readelf 可以看到 soname 字段,而 ldconfig 就能根据这个字段自动生成 soname 这个文件链接。
所谓系统标准路径
最后的最后,我们再看谈一谈所谓的系统标准路径。前面说了,dynamic linker/loader 会在编译或者程序启动、使用的时候去找那些需要的库,ldconfig 也会自动给系统的库生成链接。那么它们到底会去哪些地方找库文件呢?
ldconfig 会去读 /etc/ld.so.conf 这个文件:
|
|
这个文件直接指定了 /etc/ld.so.conf.d/ 下所有 *.conf 文件,我们接着看:
|
|
这些文件就是一个个把库文件路径列出来了。ldconfig 读完了处理完了就会生成 /etc/ld.so.cache 这个缓存文件。
但是关于 linker 的标准搜索路径,似乎大家看法不太一样,StackOverflow 上的问题 How to print the ld(linker) search path 回答很多。我仅仅演示一下,具体讨论去看网页吧:
|
|
文章作者 Jackie
上次更新 2020-05-15 (71e2f3e)